1957 spark plug wire routing

Ward 57

Ward 57

Active Member
Last seen
Joined
Aug 14, 2019
Thunderbird Year
1957
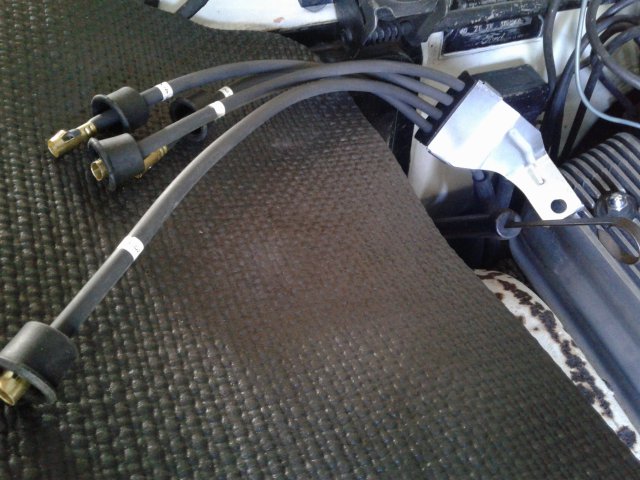
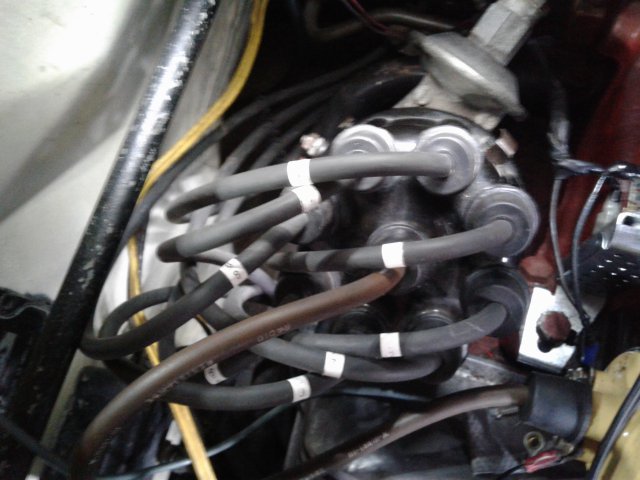
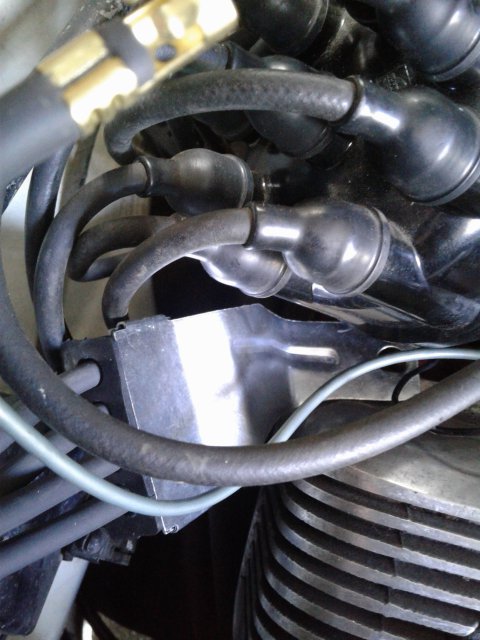
Does anybody have any good pictures of the spark plug wire routing? I'm having a devil of a time trying to rout them. I had CASCO prepare them in the brackets for only $20 but they just don't seem right, especially the right bank with the long mounting tab that mounts next to the distributor. It seems they may have mounted it backwards. The pictures from CASCO are B/W and not much good. 20210905_155234.jpg20210905_155837.jpg
 

This site contains affiliate links for which I may be compensated. As an eBay Partner, and Amazon Associate I may be compensated if you make a purchase at no cost to you.

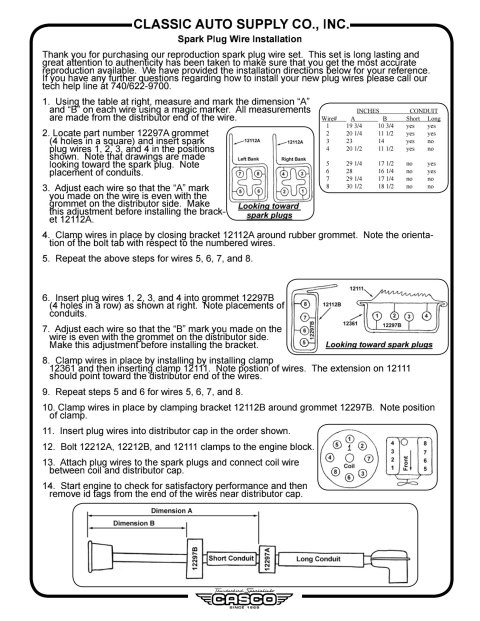
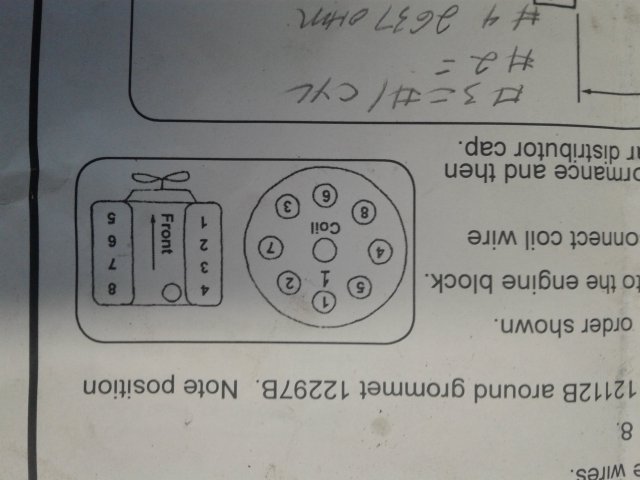
I purchased ignition wires from CASCO, but since I assembled them myself they came with the attached spark plug wire installation instructions.
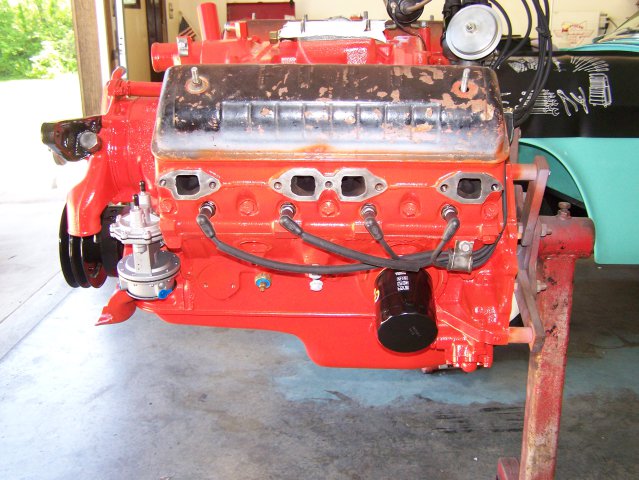
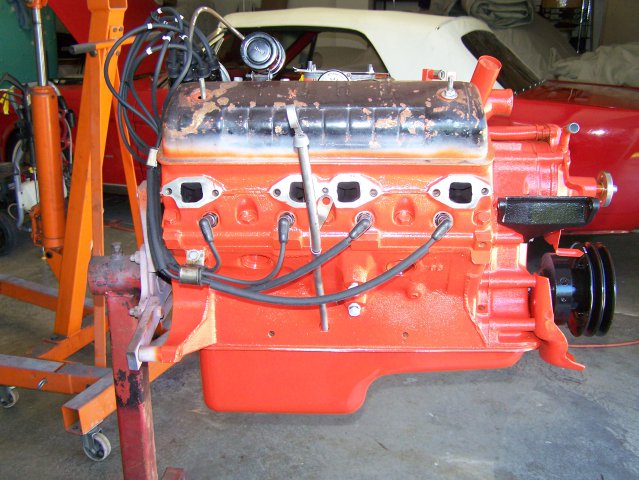
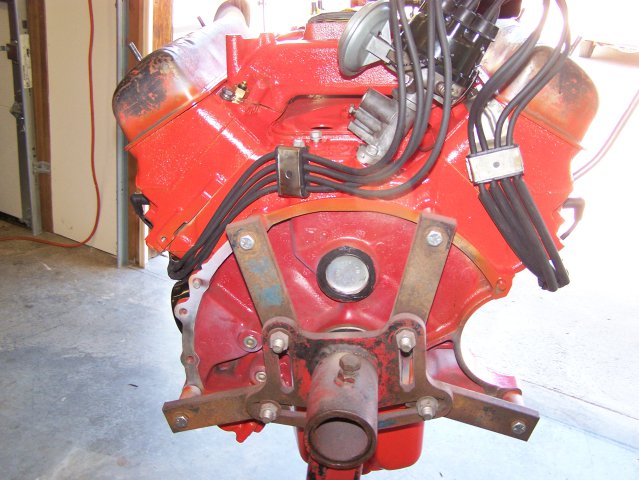
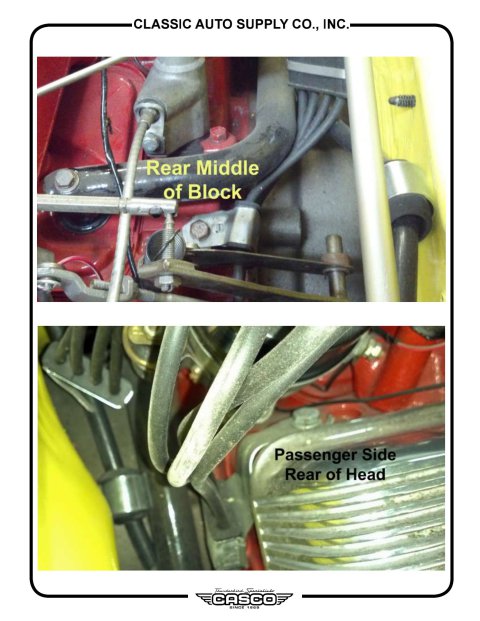
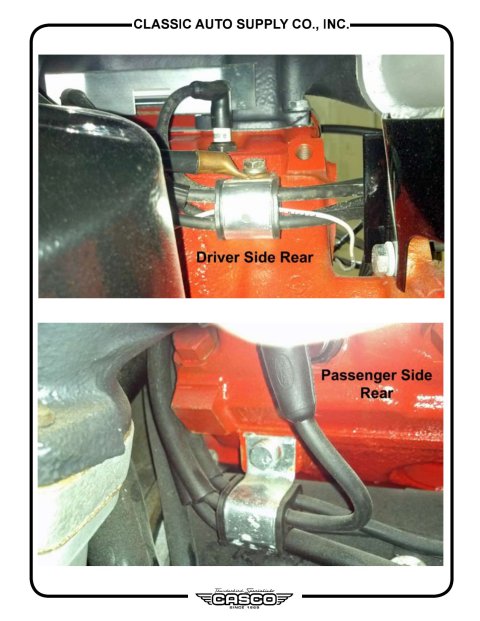
When I had the engine and transmission out of my car last year to overhaul the transmission, I replaced the ignition wires and took some pictures of the wire routing.

doug7740
1955 Thunderbird Blue

100_6600.JPG

100_6603.JPG

100_6604.JPG

18445_4ff1aae9b7224f9678df397788631048 (1)_1.jpg
18445_4ff1aae9b7224f9678df397788631048 (1)_2.jpg
18445_4ff1aae9b7224f9678df397788631048 (1)_3.jpg
 
Last edited by a moderator:
OK that bracket is definitely installed backwards. I don't think it will be to tough to disassemble and flip it around. Thanks for the confirmation.
 
OK that bracket is definitely installed backwards. I don't think it will be to tough to disassemble and flip it around. Thanks for the confirmation.
I contacted CASCO and let them know of the problem. I got a reply from a Mr. brown whom I think is the current owner after taking over from his parents. He offered to have me send them back and they will fix. Not worth the bother but gave him a heads up that something is not working right.
I did some more checking against their installation instructions and found the wires were not the correct length from the blocks even though I could see sharpie marks where they should be.
I can fix all that I'm glad to know I did a dry fit before I pulled off all the old stuff that rubbed raw in different spots. I suggested a conversation with the assembler....
 
Well now I'm perplexed. Finally got the new wires on and that was a chore. No room in that engine compartment. Now it wont start. I've got spark, double checked the proper orientation of the wires in the cap I.E. firing order and placement I'm sure the wirers on on the plugs right ( Did find two loose ones ) I may have forgotten to torque them when I installed them this spring, get gas when I pump the throttle, but nothing. ARRGHH!
 
Check all your wires (other than the spark plug wires if you are sure about them) to make sure your didn't forget to reconnect any or possibly knock one off while installing the plug wires. You have spark at the plugs and the coil?
 
Well now I'm perplexed. Finally got the new wires on and that was a chore. No room in that engine compartment. Now it wont start. I've got spark, double checked the proper orientation of the wires in the cap I.E. firing order and placement I'm sure the wirers on on the plugs right ( Did find two loose ones ) I may have forgotten to torque them when I installed them this spring, get gas when I pump the throttle, but nothing. ARRGHH!

I replaced all my wires on a V8 Pontiac and was very careful to get them all in the right spot. Yet I got them all on one notch off. You're problem may be that simple. You'll still get spark.
 
I have spark at the coil so I didn't knock any wires off there. I plugged them onto the spark plugs according to their length off the brackets. I may have to trace them and see if there was an issue there. I get an occasional pop as if they can barely fire the leftover gas in the cylinders. Very frustrating , I was expecting it to fire off after not changing anything else other than the plug wires and it ran before.
 
Last edited:
Ward,

Since you are saying that you have an occasional pop and the engine does not start, that would indicate that you might have incorrectly installed the wires in the distributor cap.

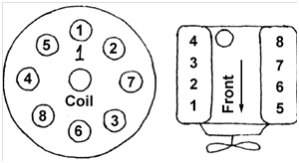
Look on the distributor cap and you will see a raised number 1 on the cap. This is where cylinder 1 ignition wire should be connected. Then follow the chart below to make sure each wire is connected to the proper location on the distributor cap and on the spark plug. You can use an ohm meter to make sure each wire is the correct wire.

1631272152968.png

doug7740
1955 Thunderbird Blue
 
Here is where it gets interesting. I did a visual and finger trace on the wires from the plugs as they can only go one way due to the length of the leads. I traced the #1 and it appears to be labeled #2 at the distributor. I do have an ohm meter but if I can trace them by look & feel It should be easier than pulling them off the plugs even though that would be definite confirmation. That would be plan 'B'. I have been in contact with Mr. Brown at CASCO whom I believe is the owner. Somebody was not paying attention when they assembled them. My first clue was the large bracket next to the dist. was installed backwards. $20 would have been a good deal to plug & play but not the case.
 
Here is where it gets interesting. I did a visual and finger trace on the wires from the plugs as they can only go one way due to the length of the leads. I traced the #1 and it appears to be labeled #2 at the distributor. I do have an ohm meter but if I can trace them by look & feel It should be easier than pulling them off the plugs even though that would be definite confirmation. That would be plan 'B'. I have been in contact with Mr. Brown at CASCO whom I believe is the owner. Somebody was not paying attention when they assembled them. My first clue was the large bracket next to the dist. was installed backwards. $20 would have been a good deal to plug & play but not the case.
Well here is a correction. I did electrically test them all and all are about 3-4 ohms and in correct order but # 4 Has 2600 ohms resistance. I'll double check my points as as a non running timing light shows it's firing about 3-4 deg late> The points are NOS so I thought they should be good as it ran fairly decently before I started this project. It's backfiring through the carb. You wouldn't think new points would shift that much but it's possible as I found the condenser mounting screw was loose. I'm stumped.
 
Checked everything, I've got spark, Haven't had to adjust the distributor for 30 years for timing, I've got fuel, even tried to make sure the spark was getting to the plugs while turning it over with my remote starter switch. Got a shock just holding the boot to the plug so I know it's getting to the plugs. I guess I made a good ground. What am I missing?
 
If your #1 is labeled #2 perhaps all are off by one cylinder. It's also possible that in the past the distributor was turned the equivalent of 1 cylinder which would make it so putting the wires in the "correct" tower hole would actually put them 1 tower off.
 
Sounds like the dist was not timed to #1 cyl when it was installed once upon a time. The Ford shop manual should indicate where the #1 cyl on the cap should sit and how the vacuum advance should sit. Also the MoToRs manuals will show this information.
 
The issue only started with the new wires. I didn't touch anything else. When at TDC the cam points directly at the #1 contacts. I'll double check my work again. I know it's getting fuel & spark but it's popping back through the carb. I've never had an issue like this before and with the new wires the possibility of crossfiring is pretty much nil.
 
Assuming the Dist is correctly installed, one of the clips that holds the cap on is at the rear upper corner of the valve cover. The wire going to # 1 cylinder is just to the rear of that clip. in other words #1 is to the left of that clip. #5 cyl is to the right of the same clip, to the front of the car. The cap on my car is a Standard brand and has no mark to identify #1 cyl.
 
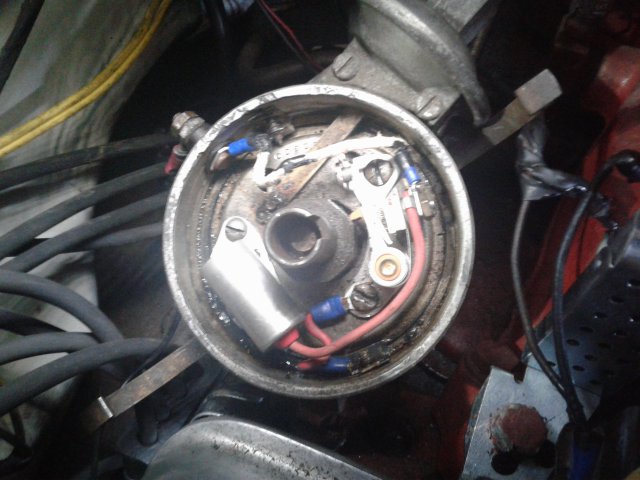
Sounds backwards to me. #1 is to the right of the clip & #5 to the left. With the cap off and the ignition on, when turning it over to TDC I could see the points sparking and when at TDC the cam points to #1. Are the points supposed to spark? Cam at TDC. Points are at .015 May try to close them a dat to retard the timing a bit. Haven't Adjusted or turned the dist. in over 30+ years. 20210911_105132.jpg20210911_112726.jpg20210911_105556.jpg
 
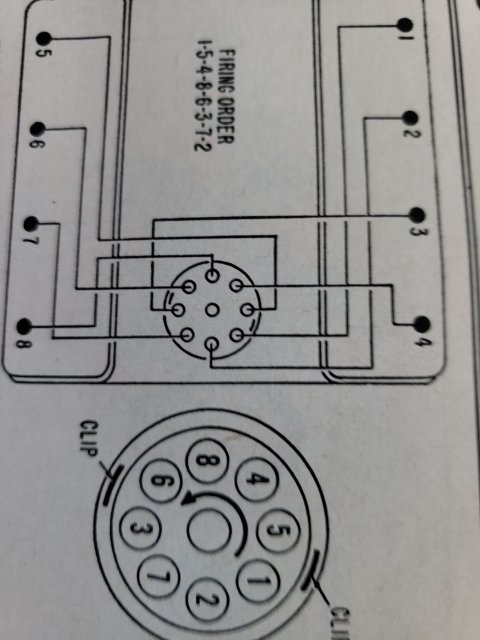
This is an illustration from a Motors manual. I checked mine and it too was different. The prior owner replaced the worn out tach drive dist and I assume clocked it wrong on assembly. The wires and brackets look like the CASCO ones you have but the PO was not so careful about adjusting the wire lengths.
Birddistpic.jpg
 
Last edited by a moderator:
I'm wondering if cracking the distributor loose and retarding the timing by a tad would help. The old wires have a resistance of over 2220 ohms. The new ones are 3-4 ohms. Could a hotter spark be causing my problems? Hence the need for less advance? I'm no expert on ignition systems. Popping through the carb is a sign of too much advance and the high resistance was causing a retarded cold spark. I was running over 6-8 deg. The old wires may have been resistor cables and the timing was advanced to compensate. Now only the coil to dist. has a higher resistance for radio noise suppression.
 
Last edited:
I think its time to step back to timing 101. Pull #1 plug out and turn the engine over with a wrench if possible til your finger in the plug hole feels compression building. Use a wire to feel the piston and bring it to TDC. Now does the rotor point to the correct plug wire with the timing mark on the crankshaft set at the correct mark? Are the points just cracking open? Then your good. I am guessing your timing is about 90 degrees off (one plug wire on the dist cap) easy mistake to make and we have all done it. If you only have two wires crossed the engine will usually start.
Just a thought, did the vacuum line from the base of the carb get bumped loose? That does not help either.
 
Back
Top