New to me 1955 TBird and a Lost member of Thunderbird Forum | Page 2 | Ford Thunderbird forum club group 1955-2005 models
  • We're glad you found us via a search engine! Right now, you can join our club absolutely free and unlock member only features like the site search! This notice only appears once! It only takes 30 seconds to register, and we would love to have you as part of the World's largest Thunderbird Forum/Club! Click here to continue

  • Click here to remove google ads from the site
  • Click " Like/Thanks" at the bottom of a member's post to reward and thank them for their response! Points are added to their profile.
  • Get rid of swirls and minor paint surface scratches with this Polish & Compounds kit. Click here to read more!.

New to me 1955 TBird and a Lost member of Thunderbird Forum

  • Thread starter Thread starter demigodofa
  • Start date Start date
Was waiting on a guy to swing by this evening so as long as I needed to warm the shop up I started on the rear leaf springs. The '55 springs were shorter than '56 frame/spring pockets than I have. Moving the spring pocket/perches wasn't worth it. I'd have to move both to keep the axle centered in the wheel well. In the middle of wrestling with it and making little headway I sat down for a minute and was looking down at my hands... and felt very fortunate. Fortunate to have the beautiful family that I do. Fortunate to live where I live. Fortunate enough to have a bad day or even skin a knuckle...

This page contains affiliate links for which I may be compensated. As an eBay Partner, and Amazon Associate I may be compensated if you make a purchase at no cost to you.


Attachments

  • IMG_20191119_182126649.jpg
    IMG_20191119_182126649.jpg
    1.2 MB · Views: 0
  • IMG_20191119_182008163.jpg
    IMG_20191119_182008163.jpg
    3.8 MB · Views: 0
  • IMG_20191119_165537465.jpg
    IMG_20191119_165537465.jpg
    5.1 MB · Views: 0
  • IMG_20191119_165533854.jpg
    IMG_20191119_165533854.jpg
    4.4 MB · Views: 0
Quite a bit done on the '55 Tbird today. I'm still sick as a dog but I just went slooooow... Pulled the '56 rear leaf springs back out had to make a few modifications and Chase some threads to do it right.
Car originally came with *some* of the power steering components. Not enough to bother with going back to original. Found a guy in California who was willing to trade components so I'm now back to manual steering up to the pitman arm. Going to try to retrofit a power steering gearbox and pitman arm to what I have.
Everything is just mocked up right now, I'll be getting new U bolts, tie rod ends etc. But the car needs lots of mocking up with the custom stuff the original owner had in mind before settling on new wear parts.
 

Attachments

  • IMG_20191207_152823237.jpg
    IMG_20191207_152823237.jpg
    3.8 MB · Views: 0
  • IMG_20191207_161118065.jpg
    IMG_20191207_161118065.jpg
    4.8 MB · Views: 0
  • IMG_20191207_131434058.jpg
    IMG_20191207_131434058.jpg
    4.1 MB · Views: 0
  • IMG_20191207_163749446.jpg
    IMG_20191207_163749446.jpg
    4.1 MB · Views: 0
  • IMG_20191207_124255069.jpg
    IMG_20191207_124255069.jpg
    1.8 MB · Views: 0
  • IMG_20191207_163738852.jpg
    IMG_20191207_163738852.jpg
    4.5 MB · Views: 0
  • IMG_20191207_163743978.jpg
    IMG_20191207_163743978.jpg
    3.7 MB · Views: 0
  • IMG_20191207_161129660.jpg
    IMG_20191207_161129660.jpg
    4 MB · Views: 0
Got the 302 bolted to the AOD from an '81 Thunderbird that Steve had with the car. I believe a 50oz. imbalance plate is what I needed for this year Windsor, just kind of learning as I go. (I know some of this isn't in the spirit of this forum and is more in hot rod land but there is plenty of '55 T-bird left to go, Lol)
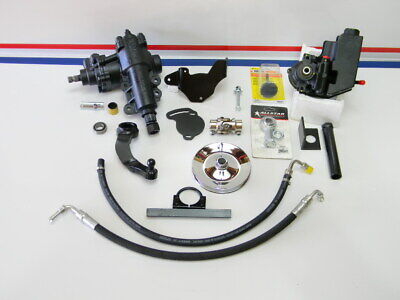
The custom motor mount locations are incorrect. The passenger side will work but I'm cutting the drivers side out. This allowed me to nestle the 302 a bit lower into the car but still keep steering clearance and got it centered in the frame rails. Before I finish removing and fabricating a new drivers side motor mount I'm waiting for my power steering kit to arrive as I will need to fabricate around the power steering box room is tight and may require smaller oil filter, filter relocation etc. I don't know if anyone has tried this power steering kit yet with the below link but I am going to give it a run and see how it does.
Also scored a cheap 600 CFM manual choke carb out of the classifieds from a hot rod guy so the mechanical pieces are starting to add up.


Attachments

  • Picture1.png
    Picture1.png
    1.7 MB · Views: 0
  • Picture2.png
    Picture2.png
    1.8 MB · Views: 0
  • Picture3.png
    Picture3.png
    1.7 MB · Views: 0
  • Picture4.png
    Picture4.png
    1.7 MB · Views: 0
  • Picture5.png
    Picture5.png
    1 MB · Views: 0
  • Picture6.png
    Picture6.png
    1.6 MB · Views: 0
  • Picture7.png
    Picture7.png
    1.6 MB · Views: 0
  • Picture8.png
    Picture8.png
    1.4 MB · Views: 0
  • Picture9.png
    Picture9.png
    1.6 MB · Views: 0
  • Picture10.png
    Picture10.png
    1.6 MB · Views: 0
Big puzzle piece today so I can figure out how to get this motor to live in a car it never did... With modern power steering that it never had... Nice assembly of parts that someone assembled and had made for the very rare '55-'57 Thunderbird hotrod. Most of these cars remain stock. Very glad for the helping hand rather than cobbling these parts together myself.
Next step is fabbing a motor mount to go around the steering gearbox. I also see that I'm now not going to be able to use a regular cast exhaust manifold I'll have to make custom headers to dance around the steering gearbox. Probably have to wrap or shield them to keep the heat from the PS pump... We'll see...
 

Attachments

  • IMG_20200312_175114710.jpg
    IMG_20200312_175114710.jpg
    4.3 MB · Views: 0
  • IMG_20200312_175114710.jpg
    IMG_20200312_175114710.jpg
    4.3 MB · Views: 0
  • IMG_20200312_182914724.jpg
    IMG_20200312_182914724.jpg
    3.8 MB · Views: 0
  • IMG_20200312_182717110.jpg
    IMG_20200312_182717110.jpg
    3.6 MB · Views: 0
  • IMG_20200312_182709402.jpg
    IMG_20200312_182709402.jpg
    3.6 MB · Views: 0
  • IMG_20200312_182702037.jpg
    IMG_20200312_182702037.jpg
    4.3 MB · Views: 0
  • IMG_20200312_180318531.jpg
    IMG_20200312_180318531.jpg
    1.2 MB · Views: 0
  • IMG_20200312_190719739.jpg
    IMG_20200312_190719739.jpg
    3.1 MB · Views: 0
  • IMG_20200312_180229169.jpg
    IMG_20200312_180229169.jpg
    3.4 MB · Views: 0
  • IMG_20200312_185332670.jpg
    IMG_20200312_185332670.jpg
    999.6 KB · Views: 0
Quick cleanup, tack and weld together...motor mount hole moved over 6" from the original location hope that's the ticket.
 

Attachments

  • IMG_20200313_180246251.jpg
    IMG_20200313_180246251.jpg
    4.2 MB · Views: 0
  • IMG_20200313_180021698.jpg
    IMG_20200313_180021698.jpg
    4 MB · Views: 0
  • IMG_20200313_180009816.jpg
    IMG_20200313_180009816.jpg
    4.4 MB · Views: 0
  • IMG_20200313_180005263.jpg
    IMG_20200313_180005263.jpg
    3.9 MB · Views: 0
  • IMG_20200313_180256823.jpg
    IMG_20200313_180256823.jpg
    4.3 MB · Views: 0
  • IMG_20200313_161434579.jpg
    IMG_20200313_161434579.jpg
    4.8 MB · Views: 0
  • IMG_20200313_174741519.jpg
    IMG_20200313_174741519.jpg
    4.4 MB · Views: 0
  • IMG_20200313_173841628.jpg
    IMG_20200313_173841628.jpg
    4.3 MB · Views: 0
That WAS NOT the ticket... Lol. Motor mount 5.0 complete finally. (4) failures on the floor but had to get it right.
Engine is level and square, mount is boxed in. Transmission mount is next. Little bit at a time...
 

Attachments

  • IMG_20200316_193045258.jpg
    IMG_20200316_193045258.jpg
    1.2 MB · Views: 0
  • IMG_20200316_192952071.jpg
    IMG_20200316_192952071.jpg
    1.2 MB · Views: 0
  • IMG_20200316_180304904.jpg
    IMG_20200316_180304904.jpg
    3.2 MB · Views: 0
  • IMG_20200316_193240338.jpg
    IMG_20200316_193240338.jpg
    4.5 MB · Views: 0
  • IMG_20200316_193101238.jpg
    IMG_20200316_193101238.jpg
    3.6 MB · Views: 0
  • IMG_20200316_191031105.jpg
    IMG_20200316_191031105.jpg
    3.4 MB · Views: 0
  • IMG_20200316_195539206.jpg
    IMG_20200316_195539206.jpg
    5.7 MB · Views: 0
  • IMG_20200316_183612222.jpg
    IMG_20200316_183612222.jpg
    1.8 MB · Views: 0
  • IMG_20200316_195516814.jpg
    IMG_20200316_195516814.jpg
    3.6 MB · Views: 0
  • IMG_20200316_183039114.jpg
    IMG_20200316_183039114.jpg
    2 MB · Views: 0
Thank you! Very daunting project but trying to keep my focus small as to not become overwhelmed.
 
I’ve been following as well. Seeing the progress you have made so far I’d say your doing well!
A project like this takes a great deal of time and patience but the final outcome will be well worth it. When you get to the point that you’re getting overwhelmed you need to take a break from the dirty work part of project and maybe just work on the next reset part of it. My 55 thunderbird restoration is not nearly as large as yours but large enough that I had to do just that!
Steve would be happy to know that you are resurrecting his baby. As will all that know the story. I for one can’t wait to get a ride in it when you’re done.
 
JDJ, I was thinking along the same lines... if I get bogged down in the drive train, wiring, plumbing WHATEVER. I'll start some underside rust repair on the body or something like that.
Excellent point and a good way to keep moving forward.
 
Had some time after work today to model and cut a couple of these. They are 7'10" long and approx 20" high out of 1/8" steel. Came out good for my limited plasma cnc skills.
I was tickled pink until I found out it won't fit over my 10' garage shop doors, Lol.... So inside they will hang until I can finish putting plywood inside my shop walls.
A little bit at a time.
 

Attachments

  • IMG_20200327_180910189.jpg
    IMG_20200327_180910189.jpg
    5 MB · Views: 0
  • IMG_20200327_180635509.jpg
    IMG_20200327_180635509.jpg
    3.6 MB · Views: 0
  • IMG_20200327_174841608.jpg
    IMG_20200327_174841608.jpg
    1.7 MB · Views: 0
  • IMG_20200327_181102969.jpg
    IMG_20200327_181102969.jpg
    3.4 MB · Views: 0
Started tackling the rear transmission mount. Problem is idk where some of these parts are from? I THINK a 1981 Thunderbird? Regardless the original stamped brace wouldn't work so made a new one. Had to drill 4 holes in the frame but... Other than this and the motor mounts the frame should stay Unmodified... Allot of work with geometry, fabbing etc. But it's sitting on its own mount now. Driveshaft is next. Again Steve had a couple donor ones. Idk what is what so figuring out the u joints etc. Will be another ball of wax. Little at a time.... Sad part is this is all "mock up" right? Idk if this motor runs, tranny is any good etc... Half the fun I suppose!
 

Attachments

  • IMG_20200327_194430173.jpg
    IMG_20200327_194430173.jpg
    4 MB · Views: 0
  • IMG_20200327_194129076.jpg
    IMG_20200327_194129076.jpg
    3.3 MB · Views: 0
  • IMG_20200327_194144416.jpg
    IMG_20200327_194144416.jpg
    3.1 MB · Views: 0
  • IMG_20200327_194417001.jpg
    IMG_20200327_194417001.jpg
    1.7 MB · Views: 0
  • IMG_20200327_194423743.jpg
    IMG_20200327_194423743.jpg
    4.7 MB · Views: 0
  • IMG_20200327_192335489.jpg
    IMG_20200327_192335489.jpg
    3.9 MB · Views: 0
  • IMG_20200327_192634896.jpg
    IMG_20200327_192634896.jpg
    3.2 MB · Views: 0
  • IMG_20200327_194104888.jpg
    IMG_20200327_194104888.jpg
    591.7 KB · Views: 0
  • IMG_20200327_195114874.jpg
    IMG_20200327_195114874.jpg
    3.5 MB · Views: 0
Back
Top