1955- Speedometer head making noise now

Notice: This site contains affiliate links for which I may be compensated. As an eBay Partner, and Amazon Associate I may be compensated if you make a purchase at no cost to you. Thank you for your support!
zeroroadkill

zeroroadkill

BlackBird Fly
Last seen
Joined
Mar 2, 2020
Thunderbird Year
1955
It never ends,
Now the speedometer head is making a grinding noise and jumps to 80mph while doing 35mph then goes silent for a while and acts normal. Going to disconnect the cable from the head and lube.
 
Had this problem, not a big deal.
You can remove the inner cable and clean it then apply some wheel bearing grease, good as new. Simple to do, but that might not fix it. Most likely the head is dry, again not a big deal. Pull the speedometer right in front of the threads where the cable screws on, on the top side is a very small cup used to oil the head. In my case I had to clean off alot over dirt to find the cup. Clean out the cup as best you can and oil. Make sure it accepts the oil , I ended up using an oil can with a pump to get through some unseen crud. Once oiled it will work as good as new.
Good luck, Tom
 
It never ends,
Now the speedometer head is making a grinding noise and jumps to 80mph while doing 35mph then goes silent for a while and acts normal. Going to disconnect the cable from the head and lube.
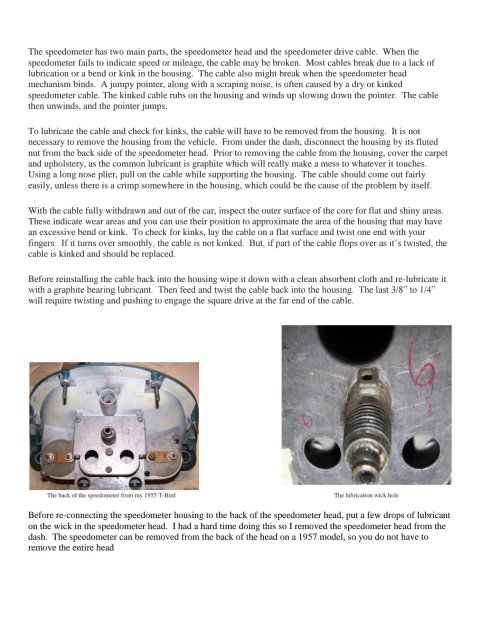
Attached is an article I wrote about speedometer lubrication.

doug7740
1955 Thunderbird Blue
13444_c818ab7f5c0dafc2c1a970ff7f476bb9_1.jpg
 

Attachments

  • Speedometer Lubrication.pdf
    148.7 KB · Views: 5
Last edited by a moderator:
Please include the model year(s) in the subject on future posts. Adding for you now. @zeroroadkill
12604_e634d8db2ff8947fb9e1cd6c7ad78a23.jpg
 
Well that ruined my morning!
Got the cable out, cleaned and fought hard to get it back in! Slight fray at end, had to trim it off. Noise still there so it has to be the head.
Has anyone ever had to remove the speedo head?

advice
 
The instrument cluster is held in place by four clips behind the dash. These clips are attached to the instrument cluster studs using nuts and lock washers. On the upper right stud, the ground wire for the instrument cluster is also attached. If you are flexible you can squirm under the dash from the driver’s door. If this becomes too painful, the seat can be easily removed to allow more comfortable access. Although it is not necessary, you can also remove the steering wheel to gain the necessary clearance when removing the instrument cluster from the dash. If the steering wheel is not removed, you can use the telescopic feature to gain 3 additional inches of clearance.

Before the instrument cluster can be removed, you must disconnect the speedometer cable by the fluted nut that attaches the cable housing to the speedometer head. You will also have to remove the wires that are connected to the fuel and temperature gauges. It would be a good idea to label these wires as you remove them. Next, remove all of the light bulbs that are in the instrument cluster. These bulbs just push in the instrument cluster and are held in place by their sockets. I would suggest that you label the bulbs as you remove them from the instrument cluster.

doug7740
1955 Thunderbird Blue
Thanks Doug! I was hoping it was just the cable but evidently not any idea why I would make that noise maybe the plastic gears are ruined?
 
The speedometer is making noise because after 66 years the lubricant on the wick in the speedometer head has dried out. A good starting point would be to put a few drops of lubricant on the wick in the speedometer head and operate the speedometer to see if that takes care of your problem.

doug7740
1955 Thunderbird Blue
Can you get to this from the back without removing it?
 
Can you get to this from the back without removing it?
Yes you can, but since the oil wick lubrication hole is at the top you will need some sort of long thin tube to deliver the oil into the hole. As I said, I had a hard time doing that so I just removed the speedometer head from the dash. I'm glad that I removed the speedometer, because I was able to completely disassemble it and repair it the proper way. If you end up removing the speedometer and disassembling it let me know I have lots of pictures of that repair.

doug7740
1955 Thunderbird Blue
 
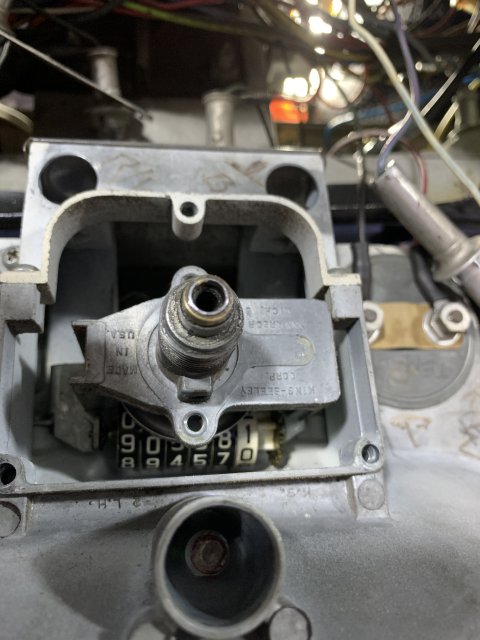
I like mechanical clocks and keeping things oiled. I almost forgot the oil cup on the distributor for the tack drive. You can find good quality oil for clocks on line or even at a sewing center sold as sewing machine oil. They are sold in a small squeeze bottle with an extendable flexible spout to get in small tight places.
 
Yes you can, but since the oil wick lubrication hole is at the top you will need some sort of long thin tube to deliver the oil into the hole. As I said, I had a hard time doing that so I just removed the speedometer head from the dash. I'm glad that I removed the speedometer, because I was able to completely disassemble it and repair it the proper way. If you end up removing the speedometer and disassembling it let me know I have lots of pictures of that repair.

doug7740
1955 Thunderbird Blue
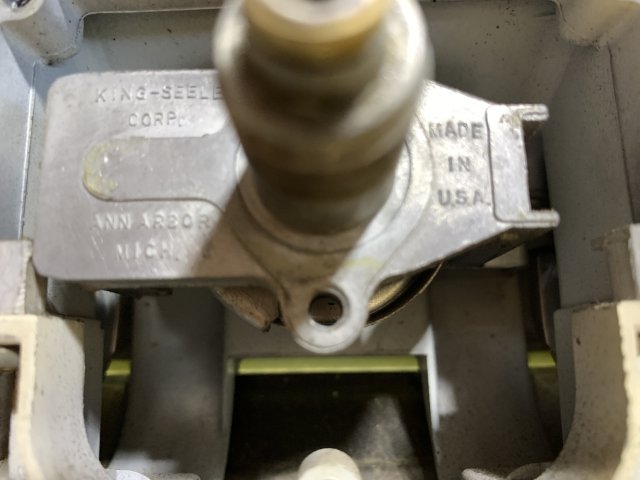
Can you remove the speedo head from the top? Looking at below it looks like a impossible job.
 
Yes you can, but since the oil wick lubrication hole is at the top you will need some sort of long thin tube to deliver the oil into the hole. As I said, I had a hard time doing that so I just removed the speedometer head from the dash. I'm glad that I removed the speedometer, because I was able to completely disassemble it and repair it the proper way. If you end up removing the speedometer and disassembling it let me know I have lots of pictures of that repair.

doug7740
1955 Thunderbird Blue
Thanks
Do you take it out through the top by removing the dome?
 
Thanks
Do you take it out through the top by removing the dome?
Doug,
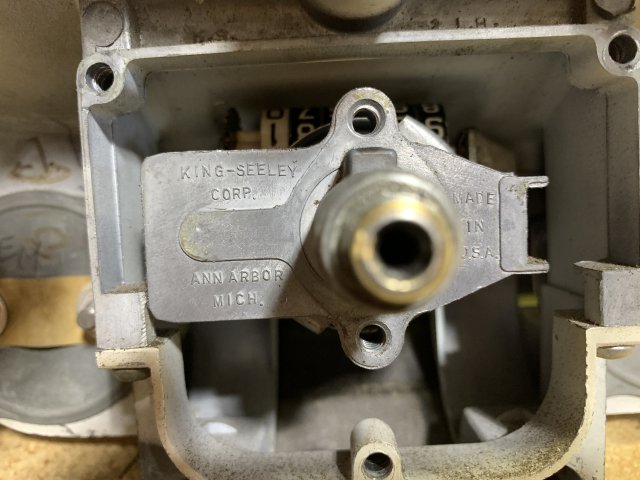
Ok got it out and the cast piece that holds the cable assembly is loose see picture. It appears to be just press fit into the backing plate? Should this be tight?
67BFDCAE-F69A-4D10-92A2-69F6B3E8C555.jpeg6AADF944-CC00-41BE-A675-6695E7B3B97F.jpegC153B45C-A200-48F9-83FE-F2A1583CFFBB.jpeg
 
Got it lubed and back in. No noise
I did find an extra bulb(blue/red) wire like all the rest but couldn’t find any empty holes in any instruments under the dash! Is there a footwell light on the drivers side?
 
Does it have a plastic connector? If so and especially that it has two wires, suggests to me it is either the oil or gen light. All the others for illumination are single wire and ground through the dash. you could confirm it if you just turn on the ignition and it lights up. ( assuming it's not burnt out).
 
Last edited:
Does it have a plastic connector? If so and especially that it has two wires, suggests to me it is either the oil or gen light. All the others for illumination are single wire and ground through the dash. you could confirm it if you just turn on the ignition and it lights up. ( assuming it's not burnt out).
Its a single blue/red wire like all of the rest of the larger bulbs. Schematic shows several blue/red wires to all the larger bulbs. Just cant find an empty hole for this one! If grounded it comes on when the lights are on. Can’t locate a home for it! All instruments have bulbs.
 
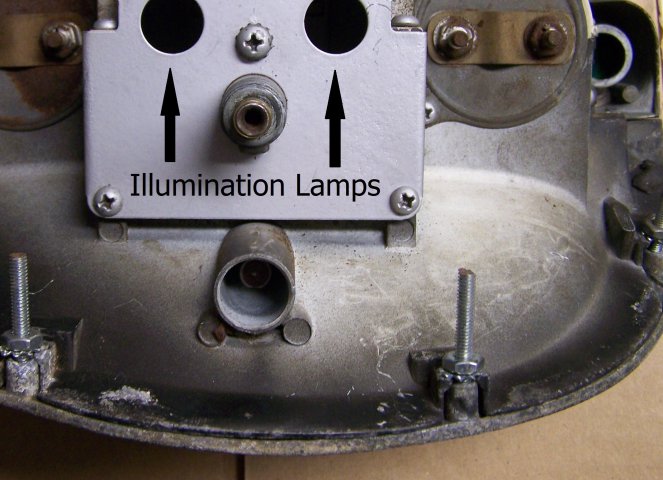
Since it is a blue/red wire it has to be an illumination lamp. There are two illumination lamp sockets on the back of the speedometer head.
In that same area you will have illumination lamps at the tachometer and clock. There is a illumination lamp for the headlamp switch, left fresh air knob and ignition switch. There is another illumination lamp for the wiper switch and cigarette lighter. There is no foot well light on a 1955 Thunderbird, only the map/courtesy lamp located over the radio.

doug7740
1955 Thunderbird Blue

Instrument Cluster Illumination Lamps.jpg
 
Yup and all of them are filled! I’m stumped
 
Back
Top